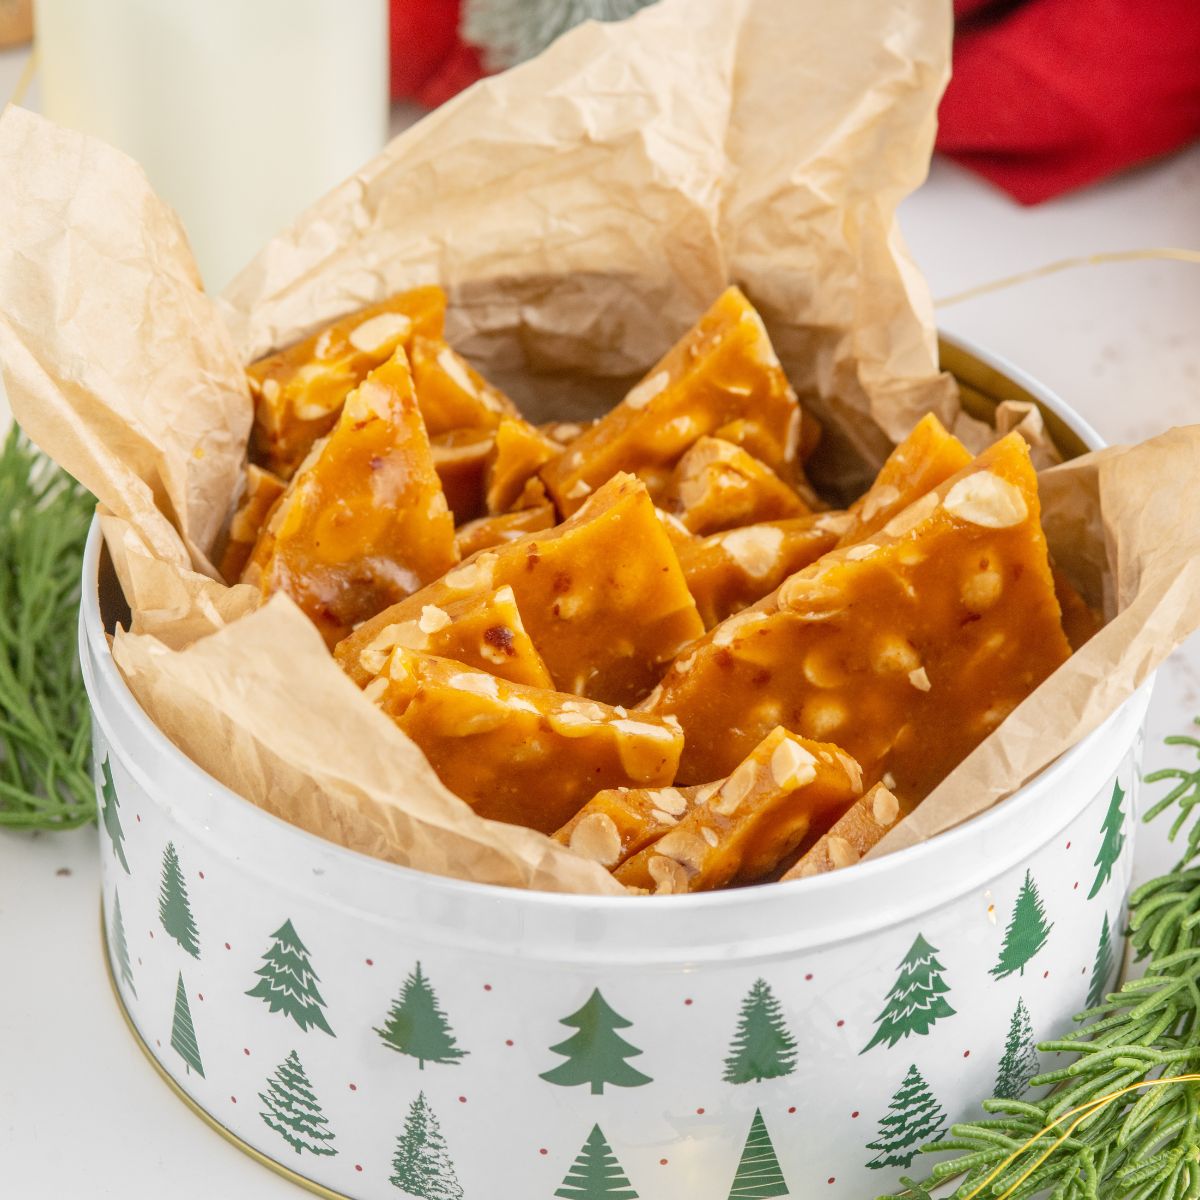
The holiday season is synonymous with warmth, joy, and the delightful aroma of homemade treats filling the air. Among the most cherished edible gifts, homemade peanut brittle stands out as a timeless classic. This sweet and salty confection, with its irresistible crunch, embodies the spirit of giving and nostalgia. Imagine a beautifully wrapped tin, brimming with glistening shards of amber-colored candy, each piece promising a moment of pure bliss. Making your own peanut brittle is not only surprisingly easy but also incredibly rewarding, ensuring your holiday gifts will be remembered long after the last satisfying crunch.
This comprehensive guide will walk you through crafting perfect peanut brittle, transforming simple ingredients into a dazzling, delicious present that wows everyone, every time. We'll delve into expert tips, address common pitfalls, and uncover the secrets to that coveted airy, light, and tender texture, proving that an old-fashioned treat can still be the star of modern gifting.
Why Homemade Peanut Brittle is the Ultimate Holiday Treat
There's an undeniable magic in a gift made with love, and homemade peanut brittle perfectly captures that sentiment. Beyond the sheer deliciousness, gifting this classic candy offers a unique blend of benefits that mass-produced alternatives simply can't match:
- A Touch of Personal Charm: In a world of commercial goods, a handmade gift speaks volumes. It shows thought, effort, and a personal connection that makes the recipient feel truly special.
- Nostalgia in Every Bite: Peanut brittle harks back to simpler times, evoking memories of grandmothers' kitchens and festive gatherings. It's a taste of tradition that brings comfort and joy. Culinary producer Nicole McLaughlin, affectionately known as NicoleMcMom, beautifully articulates this, noting, "There's just something comforting about opening this little tin and finding a little magic surprise."
- Budget-Friendly Brilliance: High-quality holiday gifts can quickly add up, but peanut brittle is made from readily available, inexpensive ingredients. This allows you to create generous batches for friends, family, and colleagues without breaking the bank.
- Crowd-Pleasing Consistency: The perfect balance of salty and sweet, combined with that satisfying crunch, makes peanut brittle universally appealing. It's a treat that transcends age and preference, guaranteeing smiles all around.
- Customizable Creativity: While peanuts are classic, the recipe is a canvas for your creativity. Experiment with different nuts or add a sprinkle of spice to tailor your brittle to individual tastes, making each gift truly unique.
Opting for old-fashioned peanut brittle with a 5-ingredient recipe and no corn syrup can further enhance its appeal, promising a pure, unadulterated flavor and texture that many find superior.
Mastering the Fundamentals: Prep, Patience, and Precision
While making peanut brittle is often described as easy, it demands respect for the process. Success hinges on a few critical principles that ensure a perfect, non-sticky, crunchy outcome every time. Think of it as a culinary sprint: quick bursts of action, but only after meticulous preparation.
Mise en Place is Non-Negotiable
This French culinary term, meaning "everything in its place," is the golden rule for brittle making. "There's no time for dilly-dallying," Nicole McLaughlin emphatically warns, and for good reason. Candy making, especially with molten sugar, moves fast. Once the syrup reaches critical temperatures, you need to react instantly. Having all your ingredients pre-measured and tools within arm's reach prevents frantic searching, burnt sugar, or a brittle that sets incorrectly.
Before you even turn on the stove, ensure you have:
- All ingredients measured out: sugar, water, raw peanuts (with skins on for a darker, richer brittle, as preferred by Nicole and her family), butter, baking soda, and salt.
- A heavy-bottomed saucepan or Dutch oven ready.
- A reliable candy thermometer clipped to the pan.
- A prepared surface: a large, buttered baking sheet, a silicone baking mat, or parchment paper laid on a flat surface.
- A heat-resistant spatula or wooden spoon.
- Oven mitts or gloves for safety.
The Right Tools for Success: The Candy Thermometer and Its Alternative
A good candy thermometer is your best friend in brittle making. It provides precise temperature readings, which are crucial for achieving the "hard crack" stage (typically 300-310°F or 149-154°C). This stage is when the sugar syrup contains almost no moisture, resulting in a crisp, brittle texture.
However, if you don't own a candy thermometer, you can rely on the old-fashioned cold water test. In step 5 (when the syrup is boiling vigorously), carefully drop a small amount of the hot syrup into a bowl of very cold water. If it immediately forms hard, brittle threads that snap when bent, it's ready. If it's chewy or soft, continue cooking.
The Weather Factor: Humidity is the Enemy of Brittle
One often-overlooked secret to perfect peanut brittle is checking the weather. Humidity is the arch-nemesis of crisp candy. If you make brittle on a humid day, the candy will attract moisture from the air as it cools, resulting in a sticky, chewy mess instead of a firm, crunchy treat. Humidity also slows down the cooling process, increasing the likelihood of unwanted sugar crystals forming. The best advice? Pick a dry, low-humidity day for your brittle-making adventure. If your environment is consistently humid, consider running a dehumidifier in your kitchen for a few hours before you start.
Safety First: Handling Molten Sugar
Molten sugar is extremely hot and can cause severe burns. Always exercise caution: wear oven gloves when handling the hot pan and pouring the brittle onto your prepared surface. Never touch the hot candy with bare hands until it has fully cooled and hardened.
The Simple Science Behind Perfect Peanut Brittle
Understanding the role of each ingredient and the science behind the cooking process demystifies brittle making, transforming it from a daunting task into an enjoyable experiment.
Key Ingredients & Their Roles
A classic peanut brittle recipe typically relies on a handful of humble ingredients, each playing a vital part:
- Granulated Sugar: The foundation of the candy, caramelizing to create the brittle structure.
- Water: Initially dissolves the sugar, allowing it to cook evenly before evaporating away as the temperature rises.
- Peanuts: The star of the show! Raw peanuts, especially with skins on, are often preferred for a richer, deeper flavor profile when toasted in the hot sugar.
- Butter: Adds a rich flavor, contributes to a smooth texture, and helps prevent the brittle from sticking to your teeth.
- Baking Soda: This is the secret ingredient for an airy, light, and tender brittle. When added to the hot sugar syrup, it reacts to release carbon dioxide gas, creating tiny bubbles that give the brittle its characteristic delicate crunch. Nicole McLaughlin points out, "You'll know you made your peanut brittle correctly... if you can see little pockets of bubbles around the edges. That shows you it'll be airy, light, and tender."
- Salt: A pinch of salt perfectly balances the sweetness, enhancing all the flavors.
While some minimalist recipes, often boasting "no corn syrup," might omit baking soda for a denser, more purely caramelized brittle, including it is key to achieving that beloved light, bubbly texture.
Hitting the Hard Crack Stage
Achieving the hard crack stage (300-310°F / 149-154°C) is paramount. Below this temperature, your brittle might be chewy; above it, it will burn. As the syrup heats, the water evaporates, concentrating the sugar. At hard crack, the sugar molecules are so concentrated that they form a rigid, glassy structure upon cooling. This is what gives brittle its signature snap. Watch your thermometer closely, and remove the syrup from the heat precisely when it reaches the target temperature, just before adding the final ingredients.
Beyond the Basics: Tips for Gifting and Storage
Once you've mastered the art of making perfect peanut brittle, consider how to present and preserve your delicious creations.
Customization Ideas for a Personal Touch
While classic peanut brittle is always a hit, don't hesitate to experiment:
- Nutty Variations: Swap peanuts for cashews, almonds, pecans, or a mix of your favorite nuts. Toasting them lightly beforehand can enhance their flavor.
- Spice it Up: A dash of cinnamon, a pinch of cayenne pepper (for a sweet-heat kick), or a touch of cardamom can add an intriguing layer of flavor. Add spices along with the salt.
- Chocolate Drizzle: Once cooled, melt some chocolate chips and drizzle them over the brittle for an extra decadent touch.
Creative Gifting for Maximum Impact
The presentation of your homemade peanut brittle can elevate it from a simple treat to an unforgettable gift:
- Elegant Tins: Classic and practical, decorative tins keep brittle fresh and look festive.
- Cellophane Bags & Ribbons: Break the brittle into varying sizes, place in clear cellophane bags, and tie with colorful ribbons for a charming, rustic look.
- Homemade Labels: Add a personal touch with handwritten labels, perhaps including a short message or the recipe name.
- Gift Baskets: Combine peanut brittle with other homemade goodies, gourmet coffee, or a bottle of wine for a truly luxurious gift basket.
Storing Your Sweet Creation
Proper storage is key to maintaining the crisp texture and extending the shelf life of your peanut brittle:
- Airtight is Best: Always store cooled peanut brittle in an airtight container at room temperature. This protects it from moisture and keeps it fresh.
- Avoid Refrigeration: Do not refrigerate peanut brittle! The moisture in the refrigerator will soften the candy and make it sticky, ruining its perfect crunch.
- Shelf Life: Properly stored, homemade peanut brittle will last one to two months, though it's often devoured much sooner!
- Freezing: Yes, you can freeze peanut brittle for up to three months. Be aware that freezing might slightly alter the texture, making it a bit less crisp. Store it in zip-top freezer bags or freezer-safe containers. Thaw it in the refrigerator overnight or on the counter for a few hours before serving.
For even more insights and advanced techniques, be sure to check out Master Peanut Brittle: Expert Tips for a Sweet, Crunchy Treat.
Making homemade peanut brittle for holiday gifts is more than just a culinary task; it's an act of love and a cherished tradition. From the meticulous preparation to the satisfying snap of each piece, the process is rewarding, and the results are consistently delightful. With the right techniques, a bit of patience, and a dash of creativity, you can craft perfect batches of this sweet and salty confection that will not only bring joy to your loved ones but also become a beloved part of your own holiday traditions. So gather your ingredients, embrace the warmth of your kitchen, and get ready to spread some crunchy, buttery magic this season!
